Download Cisco Network Security Configuration: Access Control, AAA, SNMP, URPF, CBAC, and NAT and more Summaries Computer science in PDF only on Docsity!
CISCO IOS login enhancement and how SSH Works (Day 2)
To enable telnet access we need to provide the following commands R (config)#LINE VTY 0 4 R (config )#LOGIN LOCAL
EXIT
Now if Some one is trying to perform any kind of DOS attack on to the router using TELNET To do this let us create a policy which says “ if some is made 2 fail attempt withing 15 second we will block the access for next 30 seconds both Telnet/SSH and GUI”: The command to configure this policy is as below: R(config)# login block-for 30 attempts 2 within 15 seconds (Through this command router will create an access list automatically named as sl_def_acl which will block Telnet. SSH and HTTP access and the router will go to QUITE_MODE_ON status is we check console logs messages) However by this command if attacker attempts two fail login within 15 seconds the the router will be locked for 30 second for attacker as well as for Network Admin. To overcome this issue we need to configure the following in the router Allow access to the IPs (eg. 12.1.1.1) which are to be used by Network Admin in the “Quite-Mode” access list which was created by the router automatically. R(config)# ip access-list standard 10 (created a access list) R(config-std-ncl)# permit ip host 12.1.1.1 (permitted required IP) R(config)# login quite-mode access-class 10 (bind the access list to quite-mode access list) To verify this settings we need to put the following command: R# show login Access Class vs Access-group in access control list and when to use: Access class is more like standard access list where only source ip is mentioned. Through access class may give access to entire box. Acess-class means to the box meaning no need to mention the destination. Where as access group is more like extended access list where source and destination is mentioned and it is applicable for a particular interface rather for entire box. Vulnerability: Weak point of a protocol or Network. Example of Weak Protocol-TELENT- Plain Text, HTTP-Plain Text, SNMPV1-Plain Text, SMTP-Plain Text-port no 25. Counter Msures: Telnet-SSH, HTTP-HTTPS, SNMPv1-SNMPv3, SMTP-SMTP over HTTPS What is Dynamic ARP Inspection (DIA):
Network Security Life Cycle:
1. The Fist step is Initiation meaning find out all the vulnerabilities and categories as low risk, medium risk and high risk. 2. Second Step is development : To find out all the counter-measures. Meaning find out the solution. 3. Third step id implementation : Meaning implementation of the solutions. 4. Fourth is monitoring : To monitor the changes we have done SSH (Secure Shell) There are three method to generate SSH key on Router/Switch. Method 1 : Define Host name- R(config)# Hostname CISCO Define Domain name- R(config)# ip domain-name CCIE.com Define encryption and decryption algorithm: R(config)# crypto key generate RSA. Here crypto means encryption and decryption and RSA means using RSA (Rivest, Shamir &ALDment) algorithm. Key means a mathematical algorithm who is going to perform a specific task. There are many types of key such as Authentication key, hashing key, encryption key and here we are using encryption key. If you want to generate key using RSA algorithm you need hostname and domain name. Method 2 : instead of relying on hostname and domain name to generate RSA key (as per method 1) we may manually assign the key. R(config)# crypto key generate RSA label CCIE Method 3: R(config)# IP HTTP secure server Now to enable the ssh in the Router/Switch after generation of SSH keys we need to put following commands R(config)# line vty 0 4 R(config)# login local Command to see the genetarted key is R# show crypto key mypubkey rsa****. Here mypubkey meaning is my public key. Command to delete the RSA Key R(config)# crypto key zeroize rsa
How SSH Works and privilege level (Day3 )
RSA key size needs to be at least 768 bits for SSH V SSH Versions- SSH v1.5-SSHv1 (512 to 767 RSA key size) SSH v1.99 (supports ssh v1 & sshv2) SSH v How ever for non-cisco device only supports two version of SSH (SSH V1 & V2)
Now let us consider that the ping command which is allowed in privilege level 1 should work level 2 onwards & not in privilege level 1 (which is by default). For that we need to remove the ping command from privilege level 1 and shift the command to level 2. (config)# privilege exec level 2 ping
Privilege level and AAA with Radius & Tacacs+ Header 1 (Day4 )
https://www.youtube.com/watch?v=jGFdD1hMBgM&list=PLAJ_0uchROIOL5uKDyZhMdl9-Cvt3KNuC&index= Disadvantage of Privilege level-
- inheritance Rule (a user of higher privilege level can access the lower privilege level command.
- Argument is not supported- Meaning the command (config)# privilege configure level 2 router eigrp will allow the user run router eigrp, router OSPF, router BGP ect. Here eigrp, OSPF and BGP all are argument and will allow the user to run any argument after router command. To overcome this issue cisco has introduced two concepts. i. AAA : (Authentication- who the user is, Authorization-What particular command user can run & Accounting- keep trac of user activity). By default AAA service is disable in router & switch. But in ASA it is enable by default. ii. PARSER VIEW
- All the configuration is Local at each device. To overcome this issue idea of AAA server concept has been introduced.
- ,,,,, By default aaa new-model service is disable. To enable the service we need to put the command aaa new-model. The impact of the command is that the device will start asking username and password. If the PC wanted to login at router we need a protocol that can carry username and password from Router/Switch/ASA to the AAA server & to carry the result from AAA server to R/S/A. Meaning a protocol to provide communication between the
device and server. Two such protocols are RADIUS (works on UDP, Open standard) and TACACS+ (works on TCP port 49 -CISCO proprietary) protocol. Deploying AAA Server- AAA server also called Access Control Server (ACS) & available in the form of software solution and hardware is no more available and EoL. Full form of TACACS+ is Terminal Access Controller Access Control Server. To configure the AAA service in Router/Switch we need to define the protocol and IP of AAA with a key. R(config)# aaa new-model ( enabling the AAA service first) R(config)# TACACS server host 192.168.241.100 key ABCXYZ ( defining the location of ACS server) Now we need to inform the router that if someone is trying to login then use AAA’s Authentication feature to login by using the command R(config)#aaa authentication login default/named group tacacs+ local ( defining the authentication rule) There are two method available with the command default and named. Default means apply to all available CLI options (VTY, Console & AUX). and NAMED is used to apply on particular CLI option/Options. Then we are defining that forward it to taccas by “ group tacacs+ ” word in the command. We are also adding “ local ” in the command to say the router that if tacacs server is not reachable then use local database for login. Scope of the key (ABCXYZ) mentioned above is that by this key the AAA server will validate the router is the genuine one not send by any attacker. If the key is mismatched the AAA server will reject the request. For AAA server the router is the AAA Client (the device that will send the authentication request) and for the router any one trying to access the router is the client for router. Now to verify the AAA server access by the router we need to put the following command: R# test aaa group tacacs+ legacy/ newcode Taccas+ Packet details captured on wireshark: The header details are as below Major version-what the version Minor version- ( define subversion if any) Typ1/Type2/Type3- Type1 means the packet belongs to authentication. Type2 means the packet belongs to Authorization & Type3 means the packet belong to accounting. Sequence number- TACACS is not going to rely on TCP rather it has its own built in reliability in the form of own sequence no. Then we have the payload ( user-id & password ect.) which are encrypted. =================================================================
R(Config)# authorization command 15 MYCOMANDS [ applying which command set the user can run in vty] R(Config)# tacacs-server host key CISCO [ informing the router about which AAA server to access] Configuring Radius for Authentication Step 1- Enable the service [(R-config)# aaa new-model ] Step 2-define authentication rule ( R(Config)# aaa authentication login MYAUTH group radius Step-3 – Define the location of the server [ R(Config)# radius-server host key CISCO] Step-4- Apply this rule to line vty [ R(Config)# line vty 0 4 R(Config)#login authentication MYAUTH] Configuring Radius/tacacs+ Authorization Once the user is authenticated now we need to give him cli access means privilege level. For that we need to configure Authorization section. R(Config)#aaa authorization exec default group tacacs+ [ hare exec is taken from UNIX command which means Cli or Privilege level of the user.] Now we need to define what particular command the user can run. R(Config)#aaa authorization command 0 default group tacacs+ R(Config)#aaa authorization command 1 default group tacacs+ R(Config)#aaa authorization command 15 default group tacacs+ Now as we have mentioned default it will be applicable for line vty, console and AuX. OR We can creted a named command set and apply it to the required access method such as line vty or console. The configuration is as below: R(Config)#aaa authorization command 0 CCIE group tacacs+ R(Config)#aaa authorization command 1 CCIE group tacacs+ R(Config)#aaa authorization command 15 CCIE group tacacs+ [Applying command set CCIE at vty] R(Config)# line vty 0 4 R(config-line-vty)# authorizations command 0 CCIE R(config-line-vty)# authorizations command 1 CCIE R(config-line-vty)# authorizations command 15 CCIE Radius headers Detail captured on Wireshark
Code1- Access Request ( to verify the username & password) sent by Client to AAA server Code2- Access Accept ( the username & password is correct) AAA server to AAA Client Code3- Access Reject ( wrong username & pass word) sent by AAA Server to AAA Client Packet Identifier- To uniquely identify each and every packet. In comparison Tacacs+ uses session id. Length- Authentication Field: AAA server/ACS 5.8 configuration: In ACS server the following are the major TABS a. Network Resources : (Here we will define AAA Clients.) Click Network Resources click N/W resources & AAA Clients then click create put any namethen define client IP and protocol then select TACACS button and put the key as CISCO Submit. b. User & Identity Store : (Here we will create username & password) Click User & Identity Store c. Policy element:; Here we will define privilege and command sets d. Access Policies : Here we will define rules. In policy element tab we have just created the privilege level but not assigned to anybody. Under this tab we will assign these privilege levels to users. e. Monitoring & Reports : We will configure accounting here.
create user ‘xyz” and bind it to “root’ group & assign password. “ Hosts ” tab is used for configuring those devices where username & password can not be assigned such as Printer. In such case we need to insect MAC address of the device. iii. “Under Policy element Tab” , click Device Administration and select shell profiles. Create a shell profiles as Fresher shell and root shell. Now these two shells need to bind to the users. Now click “ Command Sets” create a command set for Fresher Group as fresher command set and for Root as “ Root Command”.. c.. Access Policies TAB Now we need to bind the group, privilege and command set. These are done in “ Access Policies” tab. 35:20 see the video for further process the voice & video not synchronous
Parser View and NTP (Day 7)
https://www.youtube.com/watch?v=Vo6H1K0iiUU&list=PLAJ_0uchROIOL5uKDyZhMdl9-Cvt3KNuC&index=
NTP: NTP works on Stratum Number. For e.g EIGRP works on autonomous system number. To make a NTP server we need to define Startum number without which NTP server con not be created. Startum no. is between 1 to 15. According to NTP, client with lower startum number is preferred. If starttum no is not defined by startum number will be 7. NTP Server Configuration : R(config)# NTP master 1- R# clock set <25 march 2020> NTP Client: R(config)# NTP server To check the ntp server connection Status from NTP Client R# show ntp association We can also configured authentication on NTP. NTP updated are sent in every 64 seconds which is called polling interval. Any route with AD value of 255 will not be inserted in the routing table.
NTP ( Part 2) and Syslog (Day 8)
https://www.youtube.com/watch?v=WzNyNIuUHl0&list=PLAJ_0uchROIOL5uKDyZhMdl9-Cvt3KNuC&index= NTP Authentication Configuration: NTP Server Configuration : R(Config)#ntp authentication-key 1 md5 CISCO R(Config)# ntp trusted key 1 NTP Client Configuration : R(Config)#ntp authentication-key 1 md5 CISCO R(Config)# ntp trusted key 1 R(Config)# ntp authenticate R(Config)# ntp server key 1 prefer Syslog: 0-7 total 8 types of syslog messages. Lower is more critical. ‘Zero’ is most critical. Most of the time we will see 2 (critical) & 3 (error). Syslog message 2 & 3 is related to Dynamic Memory Allocation. Warning and notification ( 4 & 5) are most of the time related to interface status.
Advance Control Plane: There was some issues with Control Plane Policing so they introduced Control Plane Protection. The control plane policing is old feature and Control Plane Protection is new feature. In control plane policing the traffic destined to CPU are not identified based on the types of traffic rather it take the whole traffic in a aggregated manner. Normally there are 3 types of traffic which can be forwarded to cpu- They are Host traffic, transit traffic (such as NAT) and CEF exception. So through control plane policing, a particular at type of traffic cannot be controlled rather it will be applicable for all these three types of traffic. In router we can find FIB and Adjacency Table. FIB works on L3 address and Adjacency Table works on L2 address. Control plane protection
In this scenario (control plane protection) all the three types of traffic to CPU is virtually isolated and rate limit can be applied to particular type of traffic contrary to control plane policing where these three types of traffic were aggregated. Control plane Protection vs Control Plane Police Control plane Protection Control Plane Police Host, CEF, Transit Aggregate path Port Filtering Not available Queue Threshold Not available Traffic forwarding in a Router Control Plane Protection Configuration: ****Do not use Class-map match protocol rather use Access list to match the traffic type and then call the access-list in class map otherwise router is going to crash. Lets look at the following example for telnet. Control plane host configuration for Telnet access block to Control plane
SNMP has three versions (v1, v2, v3). SNMP V1 : In SNMP version 1 there are three messages GET Message - GET Message will be generated by SNMP Server. It is used to retrieve/read the information from MIB. SET Message - It is used to change/write the information in the MIB. TRAP Message – It is generated by SNMP Client. TRAP is used to create conditions. It use UDP port no 162. SNMP V2 : In SNMP v2, instead of TRAP (which has no acknowledgement mechanism) it uses INFORM message which is combination of TRAP and Acknowledgement (Inform= TRAP+ Acknowledgement). In version 2 they have introduced GET BULK command which is used to generate additional information compared as compared to GET message in SNMP version 1. SNMP v1&2 are not secured as all the information are sent in clear text. So they introduced SNMP V3. SNMP V3 : It supports SNMPv1 and SNMPv2 commands and security. It provides three types of security deployment modes AUTH (Authentication using key like eigrp, taccas ect. Here the key is not sent rather only hash value of key is sent but all other communication are in plain text only) PRIV (Authentication and Privacy (encryption). Use key for authentication and encryption. SNMPv3 Deployment- In this deployment model we need to do grouping of devices and also need to assign username and password to the devices to avoid unauthorized access to the devices. Let us create 3 groups –
Let us try to configure as per following diagram Step1- Use a access-list to define the location of SNMP server. R(config)# ip access-list standard 10 Permit hot 102.1.1. Step2- Defining SNMP version, mode of security ect. Step3-Defing the authentication credentials (username, key and md5 hash), and encryption mechanism (des) and encryption key for SNMP communication.
Queue Threshold: It means dividing the queue. There are 3 types of Queues in a Router. They are- Interface input queue Interface output queue Global input queue FIB & RIB: If a packet is received in interface of a router it will be checked by the FIB and will forward the ougoint interface if the routes is available and if the packet is destined to the box then it will be forwarded to Control Plane/CPU. o Management plane, control plane and data plane: Management Plane is used by the user to the device. Control Plane is device to device and dataplane is for forwarding traffic. Command See the available protocol support/ port mapping database in the router- o R# show ip port-map =================================================================
Cisco URPF and Control Plane Protection Part 1 (Day 12)
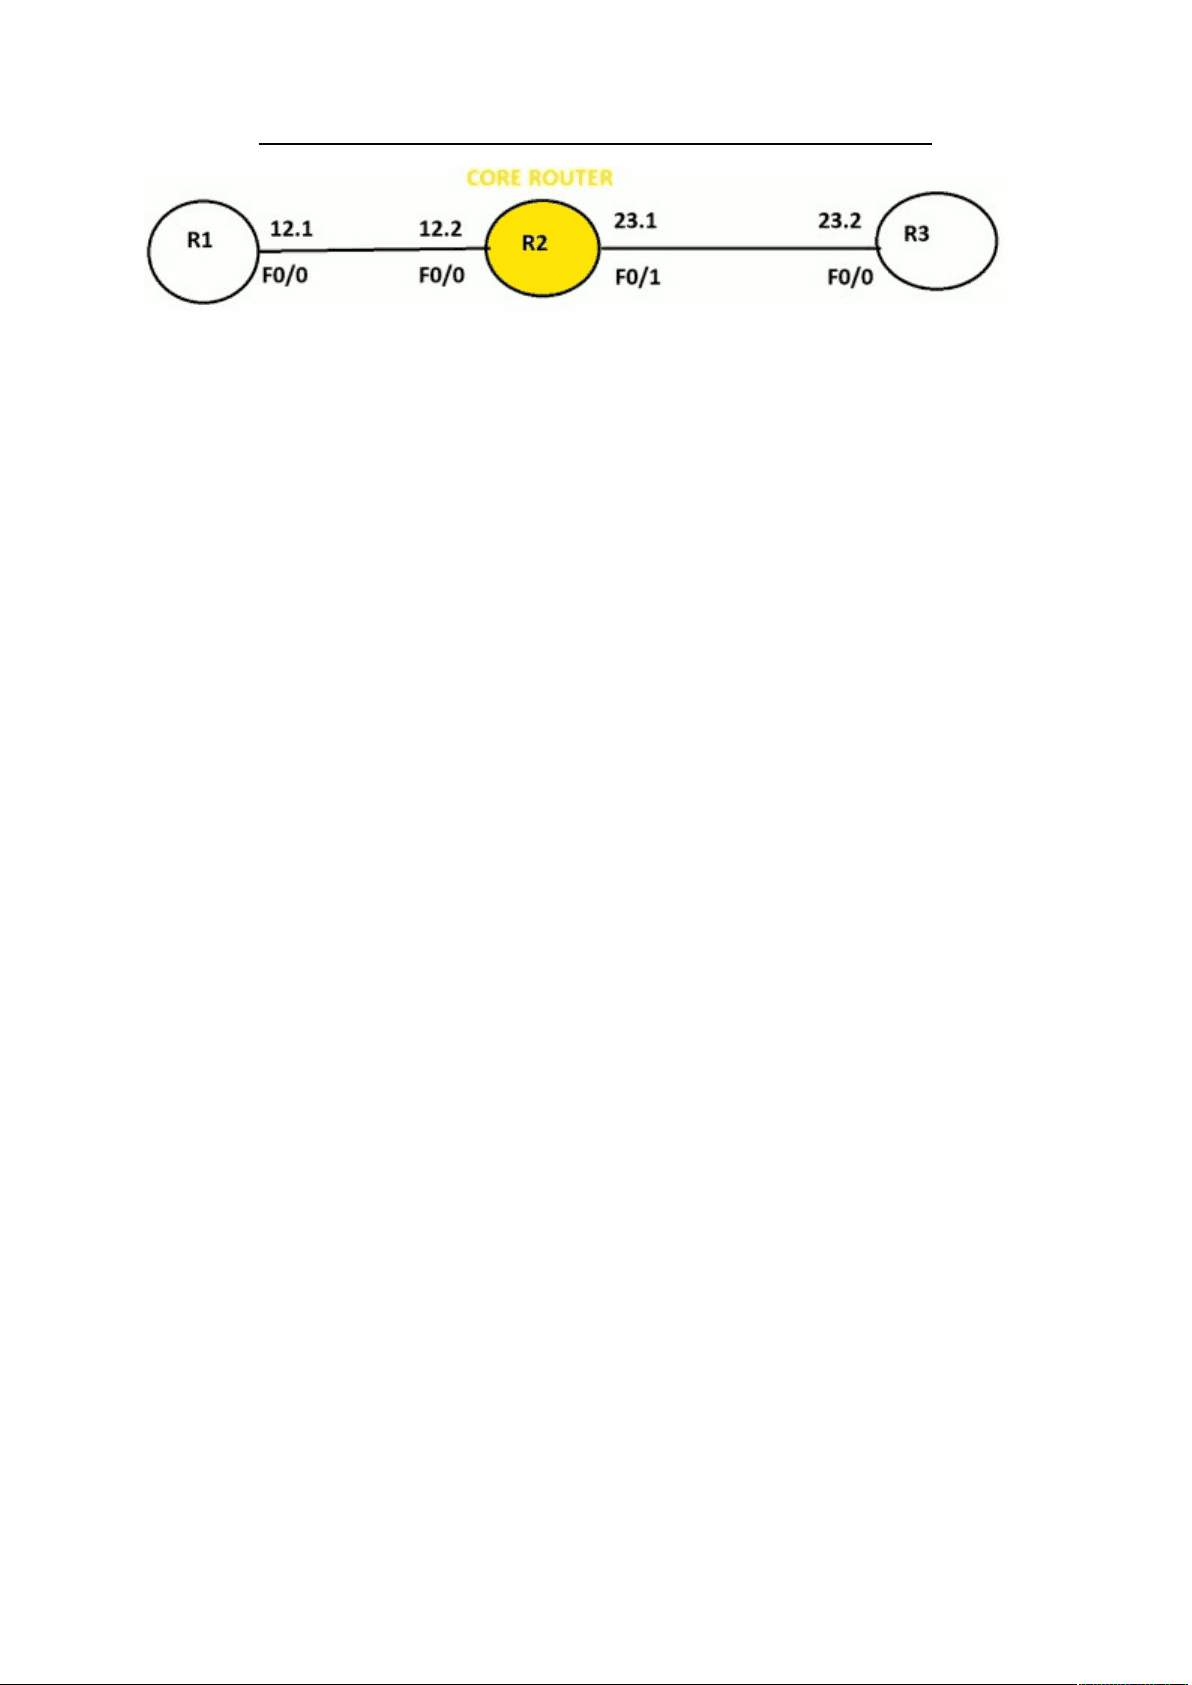
https://www.youtube.com/watch?v=1cXt70y2zG8&list=PLAJ_0uchROIOL5uKDyZhMdl9-Cvt3KNuC&index= URPF- Unicast reserve path forwarding is feature which check the reverse path for unicast traffic and if the reverse path is same interface then the packet will be forwarded if not then will drop the packet. Let us take an example: In the above example let us consider that PC is trying to spoof (lying) it IP and sending a packet to R3’s f0/1 interface with a source ip of 12.1 (R1’s f0/0 int) and destination ip 23.1 ( R2’s f0/1). Now URPF feature if enabled in R3’s f0/1 interface then it will check its routing table whether the return(reverse) traffic will hit the same interface ( fa0/1) or not to reach it source (PC). If the reply traffic interface is found different then R3 will drop the packet. If URPF not enable then the packet will return to R1(duplicate source) rather than original source (PC). To enable URPF the command is-
R(config)# int fa0/ R(config-if)# ip verify unicast reverse-path This is old command and the new command is: R(config-if)# ip verify unicast source reachable-via rx/any [ rx-Source is reachable via interface on which packet was received. Any- source is reachable via any interface] To verify the setting – R#show ip int fa0/ By default rx option does not support default route, rx option can support dynamic routing and static route. To overcome the issue we need to add key word ‘allow default’. R(config-if)# ip verify unicast source reachable-via rx allow default. We can also add exception meaning filtration through URFP will not be applicable for certain traffic. To do that let us create an access-list and allow certaing host/network and add this access-list in the command as key word. This will allow the host/network permitted by access-list to bypass pass URPF. R(config)# ip access-list extended 100 R(config-acl)# permit icmp host 1.1.1.1 host 2.2.2. Exist R(config)# ip verify unicast source reachable via rx 100 [ access-list no] By default router listen on port 23(Telnet). When R1 tries to telnet R2 there will be three- way handshake ( R1 will send sync, in reply R2 will send sync-ack and to R1 and R1 will send ACK.). To see which ports are open in router use the below command. R# show control-plane host open-ports
Control Plane Protection with Queue Threshold Part -2 &
TCP Intercept (Day 13)
https://www.youtube.com/watch?v=U0F8R4uO6q0&list=PLAJ_0uchROIOL5uKDyZhMdl9-Cvt3KNuC&index=
Reflexive ACL and CBAC- Part 1 ( Day 14)
https://www.youtube.com/watch?v=v7gnWGVbxaM&list=PLAJ_0uchROIOL5uKDyZhMdl9-Cvt3KNuC&index=