Download OSPF Configuration and Analysis - Prof. Henry Owen and more Lab Reports Electrical and Electronics Engineering in PDF only on Docsity!
ECE 4110 Routing Protocols OSPF Lab 8 (Revised 11/8/00) Due November 16, 2000 by 8:00 PM. Please use reservation schedule on door of COC331 to schedule not more than two hours of equipment time in advance. You will need a floppy disk.Take all the information you collected and answer the lab questions as well as write a short summary of what you learned. Make sure you justify all the answers you gave by collecting relevant information from the routers. Just because you capture a whole lot of show command output does not mean you answered the question. Output captured from the router should be used to help justify your answer, so keep it concise and to the point. Include the captured data in your report.
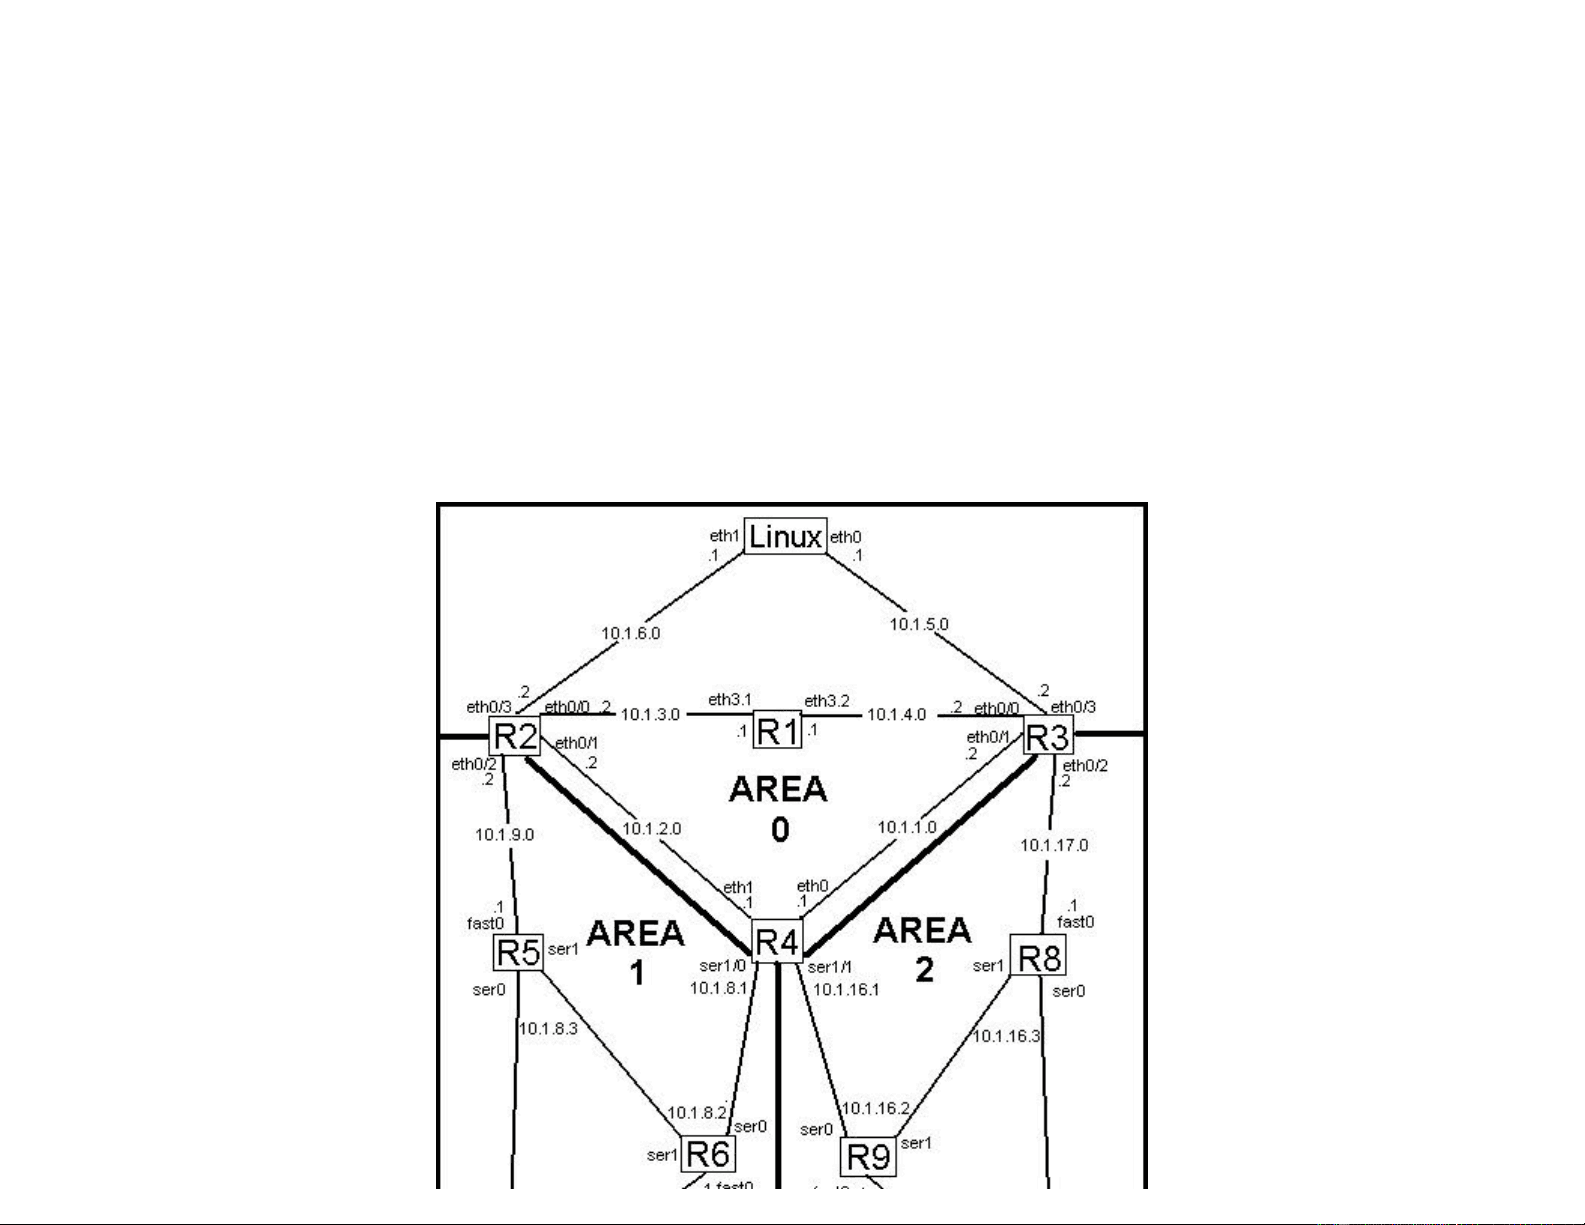
The network shown in the diagram below is already built for you:
Pre-Lab Questions:
What are the differences between a distance vector and a link-state routing protocol? What kind of routing protocol is OSPF?
What IP protocol number does OSPF use?
What is the mechanism used by OSPF routers to exchange routing information?
What is VLSM? Does OSPF support it? Justify your answer.
How does OSPF determine the metric/cost for a route?
Follow the instructions below and answer the associated questions
First, you will need to configure linux so that it will talk to the OSPF network. Run the following commands to configure networking.
ifconfig eth0 10.1.5.1 broadcast 10.1.5.255 netmask 255.255.255. ifconfig eth1 10.1.6.1 broadcast 10.1.6.255 netmask 255.255.255. route add default gw 10.1.6.2 eth
Now, ping 10.1.2.1(R4) and make sure you get a response. Note that these changes are temperary and will go away on reboot.
Now, you will need to startx if you haven’t already. Once X-windows has started open up 4 terminal windows. In the first window, type telnet 10.1.2.1 to connect to R4. At the password prompt type owen. Then type enable at the prompt. When you see the password prompt, again type owen.
To undo what a previous lab group may have done:
Once you are logged into R4,
Type telnet 10.1.2.2. Password is owen. This will connect you to R2. Now run the following commands:
a) show ip protocol i) Contrast this output with the output you saw in the RIP lab? Explain the differences. b) show ip ospf neighbor detail This shows detailed information about neighboring OSPF routers.
c) show ip ospf database This command will summarize the contents of the LS database.
Here is an example output:
R1#show ip ospf database
OSPF Router with ID (10.1.2.1) (Process ID 1)
Router Link States (Area 0)
Link ID ADV Router Age Seq# Checksum Link count 10.1.1.2 10.1.1.2 884 0x8000002B 0x545A 2
Net Link States (Area 0)
Link ID ADV Router Age Seq# Checksum 10.1.1.1 10.1.2.1 1790 0x80000029 0x25D
This shows that there are 2 types of LSA's in the database, router LSA's and network LSA's. From this output you can also see how long an LSA has been in the table, its sequence number and checksum. In the case of router link states, you also see the number of links(network interfaces) that are advertised in a particular LSA.
d) show ip ospf database router This command shows the router link-states in the LS database.
R1#show ip ospf database router
OSPF Router with ID (10.1.2.1) (Process ID 1)
Number of Links: 2 <------- The number of links described in this LSA's Link connected to: a Transit Network (Link ID) Designated Router address: 10.1.1. ^^^^^^^^^^^^^^^ Router ID of designated router for attached network (Link Data) Router Interface address: 10.1.1. ^^^^^^^^^^^^^^^^ IP address of interface Number of TOS metrics: 0 TOS 0 Metrics: 10 <------- Cost associated with that interface.
Link connected to: a Transit Network (Link ID) Designated Router address: 10.1.4. (Link Data) Router Interface address: 10.1.4. Number of TOS metrics: 0 TOS 0 Metrics: 10
What you see here are the contents of a router LSA from the database. From here you can see the router ID of the router that originated this LSA. You also see the number of links(interfaces) that OSPF is running on, the cost associated with that link, the designated router for the network connected to that link, and the IP address of the interface.
e) show ip ospf database network This command shows the network link-states in the LS database.
R1#show ip ospf database network
OSPF Router with ID (10.1.2.1) (Process ID 1)
Net Link States (Area 0)
Routing Bit Set on this LSA <------ Tells us that this LSA is used to create a route in the routing table LS age: 208 Options: (No TOS-capability) LS Type: Network Links <--------- LS Type Link State ID: 10.1.1.1 (address of Designated Router) Advertising Router: 10.1.2.1 <---- Router ID of advertising router LS Seq Number: 8000002A
00:00:15 is the time since the route was refreshed or added to the route table Ethernet 0/0 is the output interface to use to get to the next-hop router.
What is the value of the administrative distance for OSPF? Administrative Distance is the trustworthiness of a routing protocol. It is used when there are multiple routing protocols running on a router and 2 or more of them have a route to the same network ( same network and mask ). The router then chooses the route from the routing protocol that has the lowest administrative distance, i.e. is the most trustworthy.
g) traceroute 10.1.5. a) What path/s are taken? h) exit Exits R2 and returns you to R4. i) term mon This command tells the router to display all debug and log messages on this terminal session. By default log and debug messages are only sent to the console of the router. j) debug ip ospf adj This command will cause the router to display all messages relating to the forming and maintaining of OSPF adjacencies.
In the 2nd window type telnet 10.1.9.1. This will take you to R5. Login as shown above. At the prompt for R5, type telnet 10.1.8.2. This will connect you to R6. Again when prompted for a password type in owen. Then type enable and then enter owen for the password again. Then type in the following commands: On R6 type:
a) config terminal This will take you into configuration mode, so that you can modify the router configuration. b) no router ospf 1 This will let you configure the parameters for OSPF d) exit This will take you out of configuration mode
On R4 what messages do you see? Capture them all. Then do the following:
Now on R6:
a) config terminal This will take you into configuration mode, so that you can modify the router configuration. b) router ospf 1 This will let you configure the parameters for OSPF c) network 10.1.8.0 0.0.7.255 area 1 This specifies which interfaces to run OSPF on. d) exit e) exit This will take you out of configuration mode f) write memory This command will save the configuration to NVRAM, so that if the router were rebooted the changes you made would not be lost. g) exit This will disconnect you from R6.
Back on R4: What messages do you see? Capture them all to a floppy. What do you see in these messages? What is happening on R4? In the 4th^ window, type show ip ospf neighbor detail. What do you see? Do you see 4 neighbors?
Aside: To capture them highlight the text from the window, by clicking on the leftmost mouse button and moving the mouse down the screen until all the text you want to capture is highlighted. To copy the highlighted text, start any text editor and move the mouse over the text editor’s window. Click the middle mouse button. This should copy the highlighted text into the window. Save the new file. You will need it later to finish your lab report.
Now, in the 4th^ window, type exit to leave R4.
On R4 in the 1st^ window, type: a) term mon This command tells the router to display all debug and log messages on this terminal session. By default log and debug messages are only sent to the console of the router. b) undebug all
This will take you into configuration mode, so that you can modify the router configuration. b) interface fastethernet 0 This will let you configure the ethernet 0 interface c) no shutdown This will enable the interface d) exit e) exit This will take you out of configuration mode f) write memory This command will save the configuration to NVRAM, so that if the router were rebooted the changes you made would not be lost. g) exit This will disconnect you from R5.
____________________________________________________________________
Now you will rerun this experiment by taking down an interface in area 2.
On R6 and R9, run show ip route again. Save a copy of the routing tables for later comparison. Note: If the routing tables are not identical to the first copy of the routing tables you made, then you have not followed the instructions correctly!
In the 3rd^ window, type telnet 10.1.16.3 to connect to R8. Again when prompted for a password type in owen. Then type enable and then enter owen for the password again. Then type in the following commands:
a) config terminal b) interface fastethernet 0 c) shutdown d) exit e) exit f) exit These commands will disable the ethernet 0 interface on R8 and return you to R9.
i) In the 4th window, in which you are logged into R4, type ping 10.1.16.3.
iv) Do a show ip route on R6 and R9. What routes do you see? Are the routing tables different from before? If so, how and why? Save a copy of the R6’s and R9’s routing tables.
Now you need to undo the changes to R8:
From R9, type telnet 10.1.16.3 , and login to R8 again. Now type enable , password owen. Now on router R8 type in the following commands:
a) config terminal This will take you into configuration mode, so that you can modify the router configuration. b) interface fastethernet 0 This will let you configure the ethernet 0/0 interface c) no shutdown This will enable the interface d) exit e) exit This will take you out of configuration mode f) write memory This command will save the configuration to NVRAM, so that if the router were rebooted the changes you made would not be lost. g) exit This will disconnect you from R8.
Now undo the changes made to R4. On R4 in window 1 type:
a) undebug all b) exit
On R4 in window 4 type:
a) exit
_______________________________________